Monday, January 31, 2011

February Class: High-waisted Skirt with Zipper


Ok ladies I have searched high and low for a cute easy skirt.  High-waisted skirts are flattering on most everyone. {Thank you Leslie for showing me this one.}  I have finally selected this darling one entitled, The "Taking Notes" Skirt from the ever so talented Kelly Crawford of the blog Sewing in No Mans Land.  I have been corresponding with Kelly, (who lives on a tiny island North of Australia by the way!) who has been so kind to answer all my questions.  I want to make sure that I can teach it to you properly so you won't throw yours hands up and chuck your half sewn skirt across the room or in the trash.  


We are up for this challenge, right?!  I had only a few takers for the tote bag and I know more of you are capable of stepping outside your sewing comfort zone!!  This is a great skirt and in the process of making it you will learn how to apply interfacing and put in a zipper.  Daunting, no?!  We can do this together.  Kelly has told me that she would LOVE to see photos of our finished skirts:-)  


I am in the process of making the skirt right now, but I wanted you to have plenty of time to choose your fabric and notions.  Joann's currently has a 40% and 50% off coupon for in-store fabric purchases.  Check your email!  


Supplies to bring for your
HIGH-WAISTED SKIRT WITH ZIPPER


1 1/2 to 3 yards** of fabric (no knit)
**depends on how gathered you'd like your skirt- see post above for measurement calculations**
1/3 yard of fusible light interfacing
9" zipper to match fabric
Thread -one spool - choose one that will match the dominant color in your fabric.  i always pull out the thread from the spool and lay it on my fabric to see how it looks since sometimes the color of the thread all together on the spool is different from how it looks as a stitch.  choose a good general purpose thread - polyester is good for most fabrics.


Your basic sewing supplies
Machine
Machine manual
Scissors - dressmaker's (and a smaller pair would be helpful)
Tape measure
Straight pins
Seam ripper
Pressing cloth (I use a white dish towel or burp cloth)
Iron - really important!!
Ironing board (we need at least 1 per 2 people)

Once I finish my skirt, I'll post instructions on cutting out your pieces.
Happy fabric hunting!!!

Friday, January 28, 2011

February Class: Baby Blankets and Burp Clothes - GREAT Beginner Class

Blanket made by Baby Chunky Cheeks
Blanket and Burp Clothes made by Swaddle In Cloth
We are so happy to have our Guest Instructor, Cheryl Bennett, coming to teach

BABY BLANKETS and BURP CLOTHES.  

This is a FABULOUS BEGINNER CLASS!  So for those of you who are a little hesitant on your sewing skills, this will be a GREAT CONFIDENCE BOOSTER!!  Perfect for baby shower gifts or for those of you expecting:-)

Cheryl will be teaching you how to CUT and SEW your blankets and 2 burp clothes.  These will be the great sized ones, real swaddlers: square 43" size.

SUPPLIES NEEDED:

1.5 yards of flannel fabric (pre-washed* and ironed)
1.5 yards of coordinating print or solid color flannel fabric (pre-washed* and ironed)

Thread - one spool - choose one that will match the dominant color in your fabric.  i always pull out the thread from the spool and lay it on my fabric to see how it looks since sometimes the color of the thread all together on the spool is different from how it looks as a stitch.  choose a good general purpose thread - polyester is good for most fabrics.
Your basic sewing supplies
Machine
Machine manual
Scissors
Tape measure
Straight pins
Seam ripper
Hand sewing needle
Cutting board - the cardboard fold-up kind (optional, but helpful)
Iron (optional, hopefully we can share)
Ironing board (optional, but helpful)
Fabric marker or chalk (optional)

*Tip for pre-washing fabric: Launder your fabric as you would the finished project.  Oftentimes the laundering instructions will be right on the bolt of fabric in the store if you are unsure.

I found this darling flannel fabric collection online.  Not sure if it would come in time.  Just thought it was so cute!
Claire Bella Flannel - good price too!

Later in April, Cheryl will be teaching how to sew a crochet edge onto blankets and burp clothes.

ePattern for Crochet Edges found at CopyCrafts

Please let us know if you will be attending the BABY BLANKET class FEBRUARY 8th.  Thanks!!!

Friday, January 21, 2011

Basics Class Breakdown

Print made by Farouche
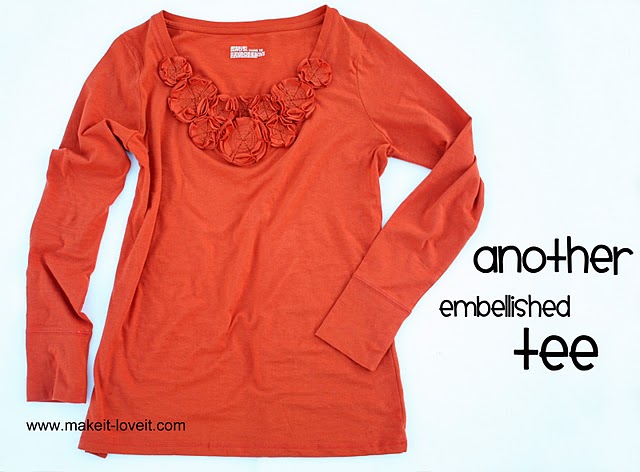
We packed the house last night with 15!!  So fun ladies.  CAN'T believe I forgot to take pictures!  Ahhh.  Thank you to all that came.  The embellished TEES turned out so darling.  Those ladies were focused!  Please send me a photo of you wearing your shirts so I can post them.

It was so great to see so many new faces in our BASICS class ready to learn to sew.  I know there was SO much to cram into one class, so I apologize if you walked away feeling overloaded.  My goal was to whet your thirst but have you leave eager to get started and armed with a good foundation for sewing.

Since me talking to you may have sounded like, "Take your fabric and blah blah blah grain blah blah blah bias blah blah stitch the seam."  I decided that a BREAKDOWN of some KEY TERMS may be helpful for those of you who attended the BASICS class last night.  {Just a quick reminder that we have a fairly comprehensive "Sewing Terms" page that you can click on right under the blog header.  Great reference and reading material:-) }

SELVAGE: The edge of the fabric. This is where the company and fabric details are written.


WITH NAP - Refers to a fabric that has a texture or design that must run in one direction on the finished garment. Fabrics with a nap can look different depending on which way you hold them, though sometimes the difference might be a very subtle variation in color. Examples of “with nap” fabrics include velvet and corduroy, satin, knit fabrics and toile designs.
WITHOUT NAP - Refers to fabrics that do not have a particular one-way texture or design. If you are unsure whether your fabric has a nap, use the “with nap” layout.


GRAIN: Refers to the orientation of the yarns in woven fabric.  Fabric Grain effects they way fabric will hang and drape.  Also it is helpful for cutting out pattern pieces to know what is what.
  • LENGTHWISE: refers to the threads in fabric which run the length of the fabric, parallel to the selvedge of the fabric.
  • CROSSWISE: are the threads that run perpendicular to the selvedge of the fabric or the cut edge of the fabric as it comes off the bolt.
  • BIAS:  The thread line that is at a forty five degree angle to the lengthwise and crosswise grain of the fabric as it is on the bolt.  The bias has stretch in woven fabric and will hang differently than a garment that has been cut on the straight or crosswise grain. 
BASTE:  a loose and easy stitch that is used to join two or more pieces of fabric together, usually for convenience until a permanent seam is sewn.  Also used when making a ruffle. Usually you remove the basting stitch.

RIGHT SIDE OF FABRIC: is the face side, the side that shows on a garment. 
WRONG SIDE OF FABRIC:  is the inside. 

If the two sides are identical, just choose one, your garment won't come out wrong if you choose inaccurately. Additionally, if you prefer the aesthetics of one side to another, use that one for your right side. There is no rule that says you have to use the manufacturer's right side. The important thing is that you are consistent in using the chosen sides as right and wrong!


RIGHT SIDES TOGETHERthe sides of the fabric that you want visible in your finished product are the "right sides", .so when you sew something that you will be turning inside out you want to put the "right sides" facing each other so they will be on the outside when you flip the garment.


INTERFACING: a material that helps stabilize certain areas of a garment - neckline, placket, front (like a blouse or jacket) or under buttonholes.  Interfacing helps the garment keep it's shape and comes in different weights as well as iron-on or sew in.


SOME GOOD BEGINNER'S PROJECTS

For those of you brand new to our group, try some of the projects that we have already done.  You can browse through our past posts for classes, supplies, at home projects, and even video tutorials by using the "Labels" section in the left hand column of the blog.  Most of these posts do not give you specific instructions on how to complete the entire project (since that's what we did in class), but it may give you an idea of where to begin.

Here is a list of our sewing projects:
ENVELOPE PILLOW
PILLOWCASE
REVERSIBLE SHOULDER BAG
APRON
PAJAMA PANTS
SCARVES
CHRISTMAS STOCKING
EMBELLISHED TEES


SOME GREAT SEWING TUTORIAL SITES FOR BEGINNERS

There is so much out there on blogs for sewing!!! So fun, but sometimes overwhelming.  Here are a few of my favorite sewing sites with some great easy tutorials.  A bunch more are listed in the left hand column of the blog.

MAKE IT AND LOVE IT  (the tutorials for the embellished tees are on here.  she has one for the envelope pillow.  she calls it a pillow slip cover. i want to try the basket liner! )
RUFFLES AND STUFF  (one of my favorites, so addicting:-)  try the 20 minute skirt, its one of our "At Home Projects" or the lady-like little girl skirt)
LITTLE BLUE BOO  (all sorts of techniques, including appliques.  the lettered beanbag tutorial looks darling.  she used it to help her little girl with spelling
CRAFTINESS IS NOT OPTIONAL (i want to try the ironing board cover.  wow, does mine need it)
LUVINTHEMOMMYHOOD (she has a great "newbie" sewing series)
CRAFT GOSSIP (posts tutorials from tons of sites.  added daily. crazy amount of stuff)

Please feel free to ask me any questions and we'd love suggestions on what you'd like to learn.  If you see a tutorial out there that you'd like to do in class, please let me know!!!

HAPPY SEWING!!!

Tuesday, January 18, 2011

January RSVP Giveaway: Cozy Slippers


Fabulous Miss Heather is busy whipping up some slippers for this night's GIVEAWAY.  Fabric and style unknown, but that's just part of the fun!  I know you wish they were these; this pair is a heated bunny slipper:-)  (Who knew?)

For those of you new to our group, we offer a giveaway each month for those who RSVP to let us know if they will be coming or not and which class they will be attending.

Various methods include: Email, Comment on Blog, Call, Yell across the neighborhood, FB, Run into me at JoAnns, or Ding Dong Ditch with a note and plate of cookies.  Any will do!

This is very helpful to Heather and I so that we can have enough handouts, supplies, tables, chairs, cords, etc for everyone.  We hope that this is does not discourage you from coming, but help you get ready for the class as well.  #1 Priority: COME!

So we hope to hear from you all today, SINCE the class IS TONIGHT.  Thanks to all those who have already RSVPed.

See ya soon!

Wednesday, January 12, 2011

Back by Popular Demand: Beginning Sewing 101

Photo from RetrospectPhoto

We are so happy that we have been getting such great interest in our group.  We received quite a few requests to repeat our first class, SEWING BASICS.  This will be a combination of 2 classes in one:  Getting to Know your Machine and Reading Patterns.  We will utilize every minute, so make sure you come ready to work!!

{Heather will be teaching a project class on embellished tees to those who feel comfortable with the basics.  See her previous post for details.}

Here are some items that you should bring....

1. At least 1/3 yard of cotton fabric (for practicing, can be just scrap fabric)
2. A pattern you are interested in learning {any time in the future :-) } (optional- if you do not have a pattern, no problem, I have plenty for you to look at)
3. A spool of all-purpose thread any color
4. Scissors
5. Machine
6. Machine instruction manual (if you lost yours, many can be found online and ordered)
7. Straight pins
8. Tape measure
9. Seam ripper
10. Needle threader (optional- handy if your machine does not have one and you have a hard time threading a needle)
11. Any of the needed items listed in the sidebar you could bring - We are anticipating a nice sized group, so any help in bringing these items would be a huge help.  Thanks!

Please feel free to invite your friends and neighbors to the class, just let us know.  I am guessing that some of those interested in this class are not on our email list, so please help spread the word!

As always, we will be having a GIVEAWAY for those of you who RSVP.  Watch for details.

** Briana **

Monday, January 3, 2011

Cute Embellished Shirts

Welcome back everyone!
Hope your Holidays were Fabulous Fun.

We are going to have lots of fun in this NEW YEAR, making lots and learning lots.

Here is a couple of shirts to embellish, just a few ideas to work with.

Flower shirt

Stripy Lines Shirt

Ruffles Shirt

All so cute and fun.

What you need is....

With all the cute shirts, which ever one fits your style......All you need to do is purchase two of the exact same shirts ...color and style. ( Shirts work better being made from a Knit Fabric, Verses a cotton fabric)

All of them are super easy to make....so pick from one or all three!

And then we go from there...just bring your style of shirts and let me know what shirt you will be doing. Let me know if you have any questions. Happy shopping.

Looking forward to seeing you in your brand new embellished shirts made by you.

~Heather

Sunday, January 2, 2011

Join Me with Your Unfinished Project


Ok so its the New Year and with it of course comes the desire to BE BETTER.  For me that involves FINISHING all the bigillions of unfinished projects I have laying around.  So for those of you who would like to join me, I will be finishing some baby shower gifts {some of them may even be for you:-) surprise!  I am like 11 gifts behind, no joke!} this TUESDAY night at my house.  Lets say 7:30 to 9:45 pm cuz Mike is working til 9 and then will need to go to sleep when he gets home to get up at 5 am and do it all over again:-)

So ladies I know you have at least one project you need to finish.  It doesn't even have to be a sewing project.  Just come and keep me company!